The first impression of a website is its load time. To improve page load time CDN services plays an important role. People may know about CDN or not but every internet users interact with CDN now-a-days. CDN serves a large portion of the Internet content today, including web objects (text, graphics and scripts), downloadable objects (media files, software, documents), applications (e-commerce, portals), live streaming media, on-demand streaming media, and social networks.
What is CDN
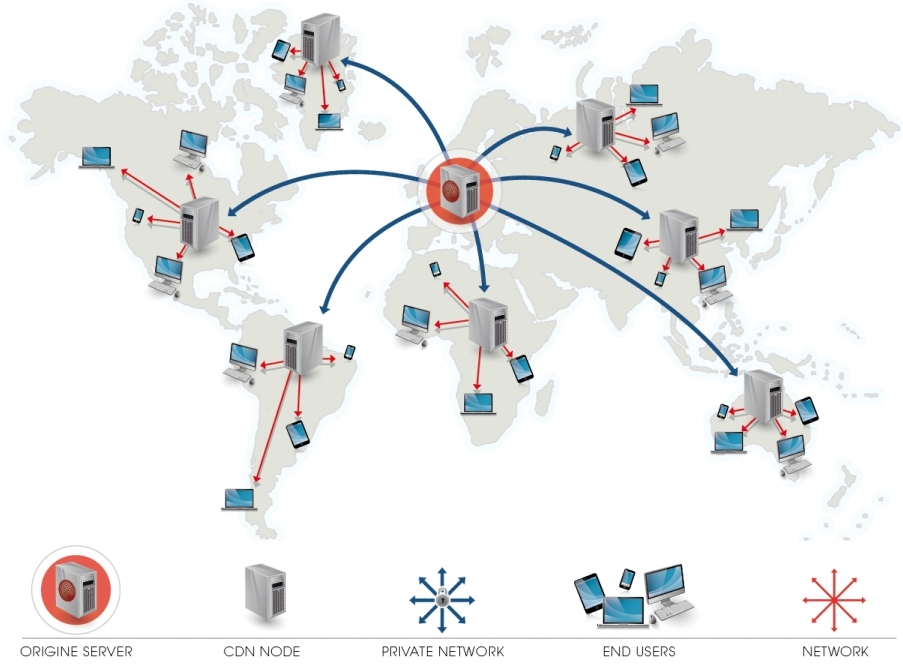
CDN stands for Content Delivery Network. CDN is a geographically distributed network of proxy servers and their data centers. Which means CDN minimizes the distance between the visitor and the web server, so the download latency is reduced. Also it serves a cached version of contents to the users of different locations.
 figure-1: CDN working principle
There are couple of CDN service providers MaxCDN, CloudFlare, Amazon CloudFront, Akamai etc. Recently one of the most popular CDN service is Fastly. Fastly, offers high speed as it employs SSD disks in their cache servers to fetch content. Also it provides Reverse Proxing, Load balancing, Header support, Origin shielding, Instant Purge support, HTTP request fulfillment and more.
Magento & Fastly
Magento is one of the best e-commerce platforms with the striking features like scalability, flexibility, robustness, customization and user-friendliness along with these using CDN service Fastly will drive your store into next level of business. Therefore, it becomes essential for store owners to look for the ways to enhance the speed and performance of the website. I have divided the whole process into two sections Firstly-side configuration and Magento-side configuration.

Firstly-side configuration
To use fastly CDN service you need an account, register a free Fastly account.
After registration and account verification, login to Fastly.
Once you logged in, you will see a welcome wizard [image-1] to setup Domain of your website and on address field set your IP address (or hostname) of your origin server.
Along with these information, it is recommended to set TLS (Transport layer Security) configuration. Enabling TLS ensures a private and unmodified connection between Fastly and your origin server. And then click on Continue for next step.

On the second step, you can add three Fastly services: GZIP, LOGGING and HEALTH CHECK. Or, you can update these preferences later. Click to continue to last step.

On final step, you can update other settings of Fastly or go live by setting point your CNAME to fastly. for more info Fastly docs

After Finishing fastly configuration, we need API Token and service ID to set on Magento side. They both will be found on [image-4] and [image-5] respectively. API tokens can be retrieve from Account > Personal API tokens. You can also create your own token. And for service ID, simply click on Show Service ID


Magento-side configuration
For magento side configuration, at first we need to install Fastly module for magento 2. The module is free and available on github.
Install Fastly using Composer with the following commands. Execute following commands from Magento root.
composer config repositories.fastly-magento2 git "https://github.com/fastly/fastly-magento2.git"

composer require fastly/magento2

bin/magento module:enable Fastly_Cdn

bin/magento setup:upgrade

bin/magento cache:clean
After installation of module, login to Magento Admin panel and move to
Stores > Configuration > Advanced > System
Under the Full page cache tab, untick the Use system value checkbox next to the Caching Application and from dropdown choose Fastly CDN.

Click on the Fastly Configuration sub section to enter your Fastly Service ID and Fastly API key. Now press the Test credentials button to be sure that your entered credentials are correct. If you get green tick mark save the configuration and clean cache.

After cleaning cache, you need to go back to the Fastly configuration section. And as the final step upload VCL to FASTLY by pressing the button Upload VCL to Fastly

A popup modal window will appear while clicking on Upload VCL to Fastly button. Tick the checkbox near Activate VCL after upload. And press the upload button. With this action you are going to send VCL configuration set to Fastly.

Once the file is uploaded to Fastly server, you will get a confirmation message. “VCL file is successfully uploaded to the Fastly service”
That’s it!! your Magento store is successfully connected with Fastly CDN.
There are some other settings and configuration, especially Advanced configuration section, please follow Fastly docs for more details.
One thought on “Configure Fastly on Magento 2”